Dust lightly with a puff after your shower — this DIY body powder leaves skin soft, fresh, and beautifully scented. There’s something wonderfully timeless about a soft puff of perfumed body powder . It’s more subtle than perfume, keeps skin silky, and carries a personal, intimate scent that lingers close to you. Best of all, you don’t need talc or complicated ingredients — you can make a talc-free body powder at home in minutes. In this guide, you’ll get: A from-scratch body dusting powder recipe (completely homemade) A baby powder upgrade recipe (transform a base you already have) 15+ scent blends you will love (from floral to cozy to citrus fresh) Pro tips on how to use, why to use, and how to make it silky and safe Why Use Perfuming Body Powder? Many people ask why bother with DIY perfumed body powder when sprays and perfumes exist. Here’s why: Soft, intimate fragrance : a veil of scent that stays close to skin Absorbs light moisture : perfect for...
Get link
Facebook
X
Pinterest
Email
Other Apps
DIY TUTORIAL / hand made leather boots / shoe repair / jak zrobić swoje własne skórzane sandały? / diy
Get link
Facebook
X
Pinterest
Email
Other Apps
Zapraszam Was na moją "butową historię",
Zbiegam po schodach i nagle buty zaczynają do mnie" mówić"..nie nie nie ,nie oszalałam !,(cytując Vass-a Montenegro;)),zwyczajnie rozkleiły mi się .
Mam je tylko około roku, znacie je już z tego Tutorialu KLIK
Możecie pomyśleć - czego się spodziewałaś głupia po takich butach,no cóż czegoś innego ;-).
Ale ok już nie raz naprawiałam buty od podstaw i teraz dam sobie radę ,ba teraz razem damy sobie radę
To jak zaczynamy?:)
When I bought those sandals I knew I won't have them for a long time but still I felt kinda sad when they finished like in photos under.
The base of those shoes is very strong and they have perfect height that's why I decide I must repair them or even create from the beginning.
Buty przed:
Shoes before:
Oba buty rozkładamy na części ,smarujemy klejem introligatorskim lub szewskim (butapren)
Disassemble both shoes,
put special shoemaker glue
Do stworzenia nowego wierzchu buta potrzebujesz:
You need:
skórę naturalną np. ze starej kurtki, ale możesz też użyć: / real leather for example from old coat
następnie wycinamy nowe części buta używając starych jako szablon
Cut new pieces of the shoes
use old pieces as a pattern
wygląda to tak ,sztuk po 4,dwa do wiązania i dwie podeszwy
Here you can see how it looks:
każdą cześć sklejamy razem (poza podeszwami i wiązadłami),klej rozprowadzaj tak jak pokazane jest na zdjęciu
Glue all parts besides insoles and lacings
put the glue in way you can see on photo
skórzane podeszwy przyklej do podeszwy buta
Glue insoles to the shoes
spinamy szczypcami i imadłami lub przyciskamy dużą ilością książek :)
w takim stanie pozostawiamy buty na 24 h
Put books or use vise and leave shoes in that state for 24 hours
do przybicia skóry do buta będziesz potrzebować pinezki tapicerskie nie szkolne !
Attach leather to the shoes with upholstery tacks
części skóry przyklejasz do buta i przybijasz pinezki po kilka sztuk na pasek (aby zabezpieczyć pinezkę przed porysowaniem połóż kawałek skóry na pinezkę następnie przybijaj )
Secure the tacks with for example leather before you use hammer
Twoje nowe skórzane buty gotowe!
Ready ''new old'' shoes :-)
stosując wiązadła zamiast klasycznych klamerek ,możesz zapinać buty na kilka sposobów
Prawda,specjalnie oderwałam podeszwy i uszyłam o 1 cm szersze,nacięłam na brzegach i przykleiłam do wkładki ,a wkładkę do buta ,niestety te zdjęcia robiłam sporo wcześniej ,a poprawki niedawno (po tym jak tylko zobaczyłam zdjęcia na macro ;)), Te butki można zrobić na kilka sposobów: zewnętrzne części jak w oryginale wewnątrz lub na zewnątrz,przyszyć lub przybić :)
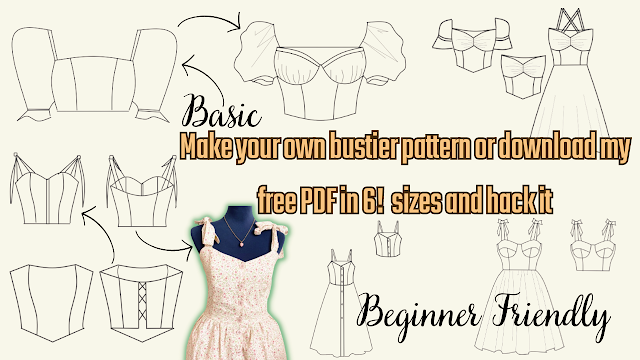
Are you ready to create your own bustier pattern? Look no further, because I've got you covered! In this tutorial, I will show you how to create your own basic bustier pattern or download my free printable PDF pattern in 6 sizes and hack it into 8 different styles, including a bustier with cups, milkmaid top, bustier with sleeves or without sleeves, bustier dress, and more. This tutorial is perfect for beginners, and I will guide you step-by-step on how to resize the pattern and add perfect sleeves. With this video, you can easily create your own custom-made bustier that fits you perfectly! But wait, there's more! Not only will you get access to my free PDF pattern, but you can also share it with your sewing friends. It's easy to download and print, and you can start creating your own bustier right away. So, don't hesitate to watch the whole video and start creating your own unique bustier pattern. And if you like this video, please give it a thumbs up and subscribe to ...
Looking for a quick and easy sewing project that's perfect for beginners? Look no further than my latest tutorial on how to sew a bralette top! This bralette top is made using fabric scraps, so it's not only budget-friendly, but also sustainable. Plus, I'm giving away a free printable PDF pattern that comes in all sizes, so you can easily make this top for yourself or as a gift for a friend. In my next post, I'll be sharing a video tutorial on how to use my free sewing PDF pattern, including how to resize it, hack it, and get creative with different variations. So make sure to subscribe to my channel and stay tuned for that! But for now, let's focus on making this super easy bralette top. My step-by-step tutorial includes detailed instructions and photos to guide you through every step of the process. And if you get stuck, don't worry - I'm always here to answer any questions you may have. So what are you waiting for? Download the free printable PDF patter...
Sewing a Backless Halter Top: An Easy and Eco-Friendly DIY Project Summer is around the corner, and what better way to prepare for the warm weather than by sewing your own backless halter top? This DIY project is perfect for beginners, as it's easy to make and requires only a few fabric scraps. In this tutorial, you will learn how to sew a stylish and comfortable backless halter top using your own measurements and a free printable PDF pattern. The pattern is designed to be adjustable, so you can customize it to your exact size. The best part of this project is that it's not only fun and easy, but it's also eco-friendly. You can use fabric scraps or old clothes that you no longer wear, and turn them into a beautiful and functional piece of clothing. To get started, you will need the following supplies: Fabric scraps or old clothes Ruler Scissors Sewing machine Pins Free printable PDF pattern (downloadable from the blog post) Step-by-Step Tutorial: Download and print the PDF ...
.heif)


.png)
.png)
oo, super samouczek :)
ReplyDeleteŚwietnie Ci to wyszło!
ReplyDeleteWow! Jestem pod wrażeniem ;-) Bardzo praktyczny post :-) Ja tez trochę przerabiam i szyję, zapraszam jeśli masz ochotę :-)
ReplyDeletePewnie że wpadnę :)
DeleteFajnie! Ale lepiej wyglądałoby gdyby nie było widać rantów. Może podkleić lub podszyć do środka?
ReplyDeletePrawda,specjalnie oderwałam podeszwy i uszyłam o 1 cm szersze,nacięłam na brzegach i przykleiłam do wkładki ,a wkładkę do buta ,niestety te zdjęcia robiłam sporo wcześniej ,a poprawki niedawno (po tym jak tylko zobaczyłam zdjęcia na macro ;)),
DeleteTe butki można zrobić na kilka sposobów: zewnętrzne części jak w oryginale wewnątrz lub na zewnątrz,przyszyć lub przybić :)
Pozdr.
Very good job! I love it. It's more beautiful now
ReplyDeletethank you!
Delete