Dust lightly with a puff after your shower — this DIY body powder leaves skin soft, fresh, and beautifully scented. There’s something wonderfully timeless about a soft puff of perfumed body powder . It’s more subtle than perfume, keeps skin silky, and carries a personal, intimate scent that lingers close to you. Best of all, you don’t need talc or complicated ingredients — you can make a talc-free body powder at home in minutes. In this guide, you’ll get: A from-scratch body dusting powder recipe (completely homemade) A baby powder upgrade recipe (transform a base you already have) 15+ scent blends you will love (from floral to cozy to citrus fresh) Pro tips on how to use, why to use, and how to make it silky and safe Why Use Perfuming Body Powder? Many people ask why bother with DIY perfumed body powder when sprays and perfumes exist. Here’s why: Soft, intimate fragrance : a veil of scent that stays close to skin Absorbs light moisture : perfect for...
Get link
Facebook
X
Pinterest
Email
Other Apps
DIY Tutorial / shoe repair / jak naprawić zniszczone lub porysowane obcasy / jak naprawić buty?
Get link
Facebook
X
Pinterest
Email
Other Apps
Każda z nas ma taką choćby jedna parę butów których by nigdy nie chciała zmienić na żadne inne niestety prawie codziennie noszony materiał szybciej się zużywa :( czasem trzeba dać im "odpocząć " aby mogły wrócić do dawnej formy
ale co zrobić jak już dopuścimy do takich zniszczeń?
z serii "Kocham ..naprawiam nie wyrzucam " mój sposób na zniszczone obcasy piętki i czubki butów
porysowane czubki butów
prawie zdarte do dziury.piętki.
ale są takie wygodne i no po prostu urocze szkoda wyrzucać trzeba dać drugą szansę !
Przepis na domowej roboty naprawę
Potrzebujemy
klej szewski ,introligatorski ,wikol lub inny równie mocny
kartka lub materiał równie dobrze na nim się odrysowuje kształty :)
papier ścierny
półprodukty gotowe to do roboty
Jak odrysować wykrój obcasów ?
przykładamy szczelnie kartkę papieru do obcasa i na wgłębieniach buta zaznaczamy ołówkiem linie cięcia
wygląda to miej więcej tak
powtarzamy proceder przy każdej części buta wymagającej naszej naprawy sztuk 1
wycinamy nasz szablon i przymierzamy do obcasa ewentualnie robimy poprawki (zawsze możesz zrobić nacięcia w szablonach przy grubszej skórze:))
pasuje jak ulał
teraz odrysowujemy nasz szablon na skórze i wycinamy po dwie sztuki ...wycinamy składając w pół aby były równe
nawet jak wytnie nam się większy nie ma problemu zrobimy poprawki już po
przed nałożeniem kleju zawsze trzeba zmatowić i odtłuścić np.zmywaczem do paznokci.
powierzchnie klejoną
obcas
piętkę i czubek buta
teraz nakładamy klej np. gąbką ,pędzlem. lub szmatką
i przyklejamy naszą skórkę miękka i delikatna skórka jest rozciągliwa dzięki czemu idealnie dopasowuje się do wszystkich zaokrągleń ewentualnie możesz wyciąć więcej skóry naciąć i nakleić nakładając na siebie rogi
zanim klej wyschnie można formować naszą nalepkę
malujemy klejem i nakładamy łatkę na piętkę i opcjonalnie czubek buta
w razie wystających części wystarczy przyciąć żyletką lub nożyczkami
Świetny patent na zniszczone buty. Ja póki co nie mam tego problemu. Buty to chyba jedyna rzecz którą lubię mieć zawsze zadbaną i staram się tak chodzić by były zawsze w jak najlepszym stanie.. :D
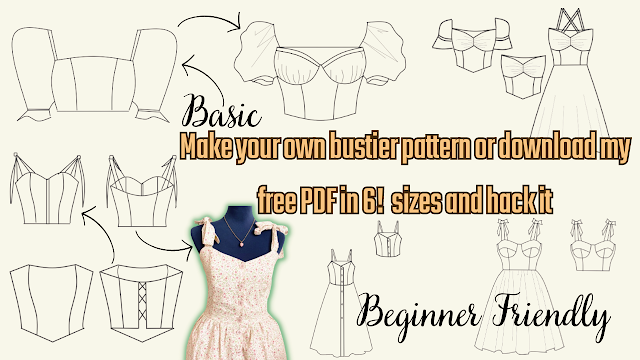
Are you ready to create your own bustier pattern? Look no further, because I've got you covered! In this tutorial, I will show you how to create your own basic bustier pattern or download my free printable PDF pattern in 6 sizes and hack it into 8 different styles, including a bustier with cups, milkmaid top, bustier with sleeves or without sleeves, bustier dress, and more. This tutorial is perfect for beginners, and I will guide you step-by-step on how to resize the pattern and add perfect sleeves. With this video, you can easily create your own custom-made bustier that fits you perfectly! But wait, there's more! Not only will you get access to my free PDF pattern, but you can also share it with your sewing friends. It's easy to download and print, and you can start creating your own bustier right away. So, don't hesitate to watch the whole video and start creating your own unique bustier pattern. And if you like this video, please give it a thumbs up and subscribe to ...
Looking for a quick and easy sewing project that's perfect for beginners? Look no further than my latest tutorial on how to sew a bralette top! This bralette top is made using fabric scraps, so it's not only budget-friendly, but also sustainable. Plus, I'm giving away a free printable PDF pattern that comes in all sizes, so you can easily make this top for yourself or as a gift for a friend. In my next post, I'll be sharing a video tutorial on how to use my free sewing PDF pattern, including how to resize it, hack it, and get creative with different variations. So make sure to subscribe to my channel and stay tuned for that! But for now, let's focus on making this super easy bralette top. My step-by-step tutorial includes detailed instructions and photos to guide you through every step of the process. And if you get stuck, don't worry - I'm always here to answer any questions you may have. So what are you waiting for? Download the free printable PDF patter...
Sewing a Backless Halter Top: An Easy and Eco-Friendly DIY Project Summer is around the corner, and what better way to prepare for the warm weather than by sewing your own backless halter top? This DIY project is perfect for beginners, as it's easy to make and requires only a few fabric scraps. In this tutorial, you will learn how to sew a stylish and comfortable backless halter top using your own measurements and a free printable PDF pattern. The pattern is designed to be adjustable, so you can customize it to your exact size. The best part of this project is that it's not only fun and easy, but it's also eco-friendly. You can use fabric scraps or old clothes that you no longer wear, and turn them into a beautiful and functional piece of clothing. To get started, you will need the following supplies: Fabric scraps or old clothes Ruler Scissors Sewing machine Pins Free printable PDF pattern (downloadable from the blog post) Step-by-Step Tutorial: Download and print the PDF ...
.heif)


.png)
.png)
ciekawe i wyszło całkiem fajnie :)
ReplyDeletefaktycznie butki wyglądają po naprawie jak nowe:)) świetny pomysł, na pewno wykorzystam:))
ReplyDeleteŚwietny patent na zniszczone buty. Ja póki co nie mam tego problemu. Buty to chyba jedyna rzecz którą lubię mieć zawsze zadbaną i staram się tak chodzić by były zawsze w jak najlepszym stanie.. :D
ReplyDeletepomysl przedni,mimoze rowniez dbamobuty to jednak obcasy mam zawsze poharatane,przynajblizszej sposobnosci wyprobuje twoja metode,pozdrawiam
ReplyDeletejuż lepiej zanieść do szewca, przynajmniej zrobi to ładnie - tutaj wyszło fatalnie ....
ReplyDeleteAnonimowy26 sierpnia 2013 14:33
ReplyDeletewydać pieniądze jest łatwiej niż zarobić najpierw spróbuj sama tobie może wyjdzie lepiej niż mi :)
pomysł super, butki wyglądają świetnie :)
ReplyDeleteThis comment has been removed by a blog administrator.
ReplyDeleteWyszło super :) Zawsze mam problemy ze zniszczonymi obcasami.
ReplyDeleteDzięki....bardzooo.Szukałam właśnie takiego DIY.
ReplyDeleteŻycie mi uratowałaś😍
bardzo się cieszę :-))
Delete