Dust lightly with a puff after your shower — this DIY body powder leaves skin soft, fresh, and beautifully scented. There’s something wonderfully timeless about a soft puff of perfumed body powder . It’s more subtle than perfume, keeps skin silky, and carries a personal, intimate scent that lingers close to you. Best of all, you don’t need talc or complicated ingredients — you can make a talc-free body powder at home in minutes. In this guide, you’ll get: A from-scratch body dusting powder recipe (completely homemade) A baby powder upgrade recipe (transform a base you already have) 15+ scent blends you will love (from floral to cozy to citrus fresh) Pro tips on how to use, why to use, and how to make it silky and safe Why Use Perfuming Body Powder? Many people ask why bother with DIY perfumed body powder when sprays and perfumes exist. Here’s why: Soft, intimate fragrance : a veil of scent that stays close to skin Absorbs light moisture : perfect for...
Get link
Facebook
X
Pinterest
Email
Other Apps
Dress refashion / Jak zmniejszyć i zwęzić sukienkę
Get link
Facebook
X
Pinterest
Email
Other Apps
''When summer ☀ is in the city we need dresses to have fun💃'' I made it up but probably you can agree with me that dresses👗 are perfect for summer. Not so long ago I bought 2👗👗 pretty but very big and not so modern style dresses in sh near me.You can see both on 👉my instagram. They are made from perfect fabric for summer , in beautiful colors and patterns, I had no choice❕😻 I had to refashion them .
Musicie się ze mną zgodzić ,że sukienki 👗to ubranie idealne na lato ☀ .
Tak się składa, że nie tak dawno temu robiłam zakupy w nowo odkrytym sh i w ręce wpadły mi dwie za duże ,w starym stylu choć w pięknych kolorach i wzorach sukienki , nawiasem mówiąc możecie je zobaczyć na moim instagramie .
Dodatkowo na ich korzyść wpływa to, że są uszyte z materiałów idealnych na lato , zdecydowanie warte poświęcenia im czasu i przerobienia ich w bardziej nowoczesny fason💃
Dress Before : Sukienka Przed:
I found this very pretty dress in little sh near my home, it was way too big and in ''granny style''👵 but I felt in love ❤ with this warm beautiful color and patterns. The fabric is 100 % viscose which is great for summer.
Tą sukienkę odkryłam w sh niedaleko mojego domu , była zdecydowanie za duża i w "babcinym stylu" ale zauroczyła mnie swoim ciepłym bordowym kolorem i ślicznymi wzorami .
Materiał z jakiego została uszyta sukienka to 100% wiskoza więc jest idealna na lato ❗
with little help of the ruler mark the right length of the dress and cut off excess fabric fold raw edges twice and sew it with single stitch
z pomocą linijki wyznaczamy długość sukienki i odcinamy
następnie surowy brzeg sukienki podwijamy podwójnie i przeszywamy ściegiem prostym
How to resizing an oversized dress ❔
Jak zwęzić i zmniejszyć sukienkę ❓
resize the dress on darts, thanks this trick it'll keep the original form
zmniejszamy sukienkę po zaszewkach dzięki czemu zachowamy jej oryginalną formę
Cold shoulder
Sukienka bez ramiączek
fold the edges of the arm and sew
optional
add additional ''arm'' and voila we have dress without arms with '' little arms ''
lol so confusing 😇
ramiona podwijamy i podszywamy opcjonalnie doszywamy dodatkowe ramiączko
i otrzymujemy sukienkę bez ramion
Refashioned dress
Przerobiona sukienka
now dress is visible shorter
I cut off arms ,
resized it on darts , 3 cm of each
I added special ''little arms''
and changed buttons 👉claretand black are color block 👀
skróciłam ✂ sukienkę
z sukienki usunęłam rękawy
zwęziłam suknię po zaszewkach około 3 cm każda
do rękawów sukienki dodałam ramiączka
a na deser wymieniłam guziki białe na czarne, gdyż bordo i czarny tworzą razem stylowy '' color block''
here 👇 you can see ready dress on me, I love ❤ love the color, claret is one of my favourite ❗.
Dress is now super comfortable and fit perfectly . I'm really happy 😊 because of this refashion , to be honest ealier I was afraid a little of resizing ✂ dresses I always wanted my all refashions to be wearable, not just for 1 time for photoshoot and sewing dresses seemed to be very difficult ..., but it's past ❕, soon I will show another dress refashion. It's important to fight with our fears 👹🔫
😉.
tutaj 👇 mozna zobaczyć gotową sukienkę na mnie
. Z całą pewnością będę ją nosiła często, gdyż jest bardzo wygodna❕ w idealnym kolorze 👉 bordo i wykonana z perfekcyjnego materiału na lato.
Dress Before and After
sukienka Przed przeróbką i Po
i tak dzięki tej przeróbce odbyliśmy małą podróż w czasie 💃
remember to refashion only good fabrics , don't waste your precious time on clothes you won't be able to wear at least for 5 years
it will be perfect if your daughter or son will have the occasion for refashion your old clothes as well 😉
pamiętaj ❕
przerabiaj zawsze ubrania tylko dobrej jakości, uszyte z wygodnych i praktycznych materiałów
kto wie może w przyszłości Twoja córka przerobi ponownie Twoją sukienkę tym razem według innego stylu
Krawcową nie jestem ale z tego co widzę, przeróbki są najbardziej pracochłonne.Bardzo podoba mi sie Twoja wersja, modna i bardzo kobieca. Wycięcia na rękawkach przykuwają uwagę :-)
Wonderul refashioning! For the darts, did you follow already existed seams or you created them from the beggining? The second looks extremely difficult for me. Could you show us more details of that method? Thank you for the inspiration!
thank you !!<333 Yes, I followed already existed seams, I wanted this dress to keep original form. Sure :-) I will focus more on this in my next dress refashion, hugs!
Bardzo udana metamorfoza! "po" jest ZDECYDOWANIE lepsze! Podziwiam za wyobraźnię i kreatywność - gdybym zobaczyła taką sukienkę w wersji "przed" w życiu nie wpadłabym na to, że można zrobić z niej takie cuda ;)
Kolejna genialna metamorfoza, ja chyba nigdy nie przestane się zachwycać tym, jak potrafisz przerabiać ubrania:) Aż żal, że nie ma wśród mojej rodziny i znajomych kogoś tak zdolnego jak ty, podsunęłabym mu kilka swoich rzeczy ;)
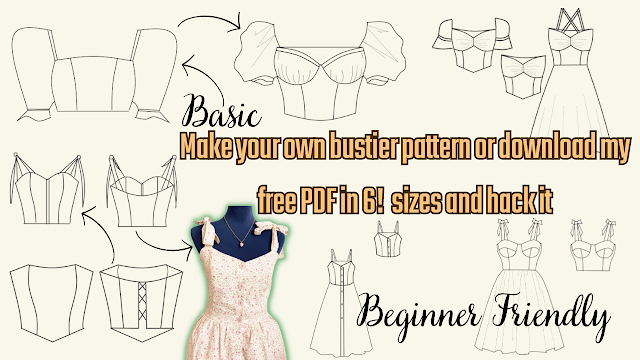
Are you ready to create your own bustier pattern? Look no further, because I've got you covered! In this tutorial, I will show you how to create your own basic bustier pattern or download my free printable PDF pattern in 6 sizes and hack it into 8 different styles, including a bustier with cups, milkmaid top, bustier with sleeves or without sleeves, bustier dress, and more. This tutorial is perfect for beginners, and I will guide you step-by-step on how to resize the pattern and add perfect sleeves. With this video, you can easily create your own custom-made bustier that fits you perfectly! But wait, there's more! Not only will you get access to my free PDF pattern, but you can also share it with your sewing friends. It's easy to download and print, and you can start creating your own bustier right away. So, don't hesitate to watch the whole video and start creating your own unique bustier pattern. And if you like this video, please give it a thumbs up and subscribe to ...
Looking for a quick and easy sewing project that's perfect for beginners? Look no further than my latest tutorial on how to sew a bralette top! This bralette top is made using fabric scraps, so it's not only budget-friendly, but also sustainable. Plus, I'm giving away a free printable PDF pattern that comes in all sizes, so you can easily make this top for yourself or as a gift for a friend. In my next post, I'll be sharing a video tutorial on how to use my free sewing PDF pattern, including how to resize it, hack it, and get creative with different variations. So make sure to subscribe to my channel and stay tuned for that! But for now, let's focus on making this super easy bralette top. My step-by-step tutorial includes detailed instructions and photos to guide you through every step of the process. And if you get stuck, don't worry - I'm always here to answer any questions you may have. So what are you waiting for? Download the free printable PDF patter...
Sewing a Backless Halter Top: An Easy and Eco-Friendly DIY Project Summer is around the corner, and what better way to prepare for the warm weather than by sewing your own backless halter top? This DIY project is perfect for beginners, as it's easy to make and requires only a few fabric scraps. In this tutorial, you will learn how to sew a stylish and comfortable backless halter top using your own measurements and a free printable PDF pattern. The pattern is designed to be adjustable, so you can customize it to your exact size. The best part of this project is that it's not only fun and easy, but it's also eco-friendly. You can use fabric scraps or old clothes that you no longer wear, and turn them into a beautiful and functional piece of clothing. To get started, you will need the following supplies: Fabric scraps or old clothes Ruler Scissors Sewing machine Pins Free printable PDF pattern (downloadable from the blog post) Step-by-Step Tutorial: Download and print the PDF ...




Krawcową nie jestem ale z tego co widzę, przeróbki są najbardziej pracochłonne.Bardzo podoba mi sie Twoja wersja, modna i bardzo kobieca. Wycięcia na rękawkach przykuwają uwagę :-)
ReplyDeleteDziękuję <3
DeleteWonderul refashioning! For the darts, did you follow already existed seams or you created them from the beggining? The second looks extremely difficult for me. Could you show us more details of that method? Thank you for the inspiration!
ReplyDeletethank you !!<333 Yes, I followed already existed seams, I wanted this dress to keep original form. Sure :-) I will focus more on this in my next dress refashion, hugs!
DeleteWyglądasz w niej olśniewająco :)
ReplyDeleteOh <3 Ty wiesz jak prawić komplementy ;P
DeleteNice dress! Very interesting style!
ReplyDeleteFashion’n’Pasion
Thx !<3
DeletePatrząc na nową wersję aż trudno uwierzyć jak ta sukienka wyglądała wcześniej, genialna metamorfoza. Pozdrawiam Ania
ReplyDeleteFajnie wyszło! Sukienki z wycietymi i odkrytymi ramionami bardzo mi się podobają, ale w oryginale też ciekawa, ale trzeba lubić taki styl!
ReplyDeleteMyślę że Kate Moss lub Cara Delevingne w oryginale by wyglądały bosko bo mają taki typ figury , dodały by tylko pasek w talii i bang magia ^^
DeletePięknie ci to wyszło :) Śliczna sukienka <3
ReplyDelete<3
Deleterewelacyjna przeróbka :)
ReplyDelete:))
DeleteBardzo udana metamorfoza! "po" jest ZDECYDOWANIE lepsze!
ReplyDeletePodziwiam za wyobraźnię i kreatywność - gdybym zobaczyła taką sukienkę w wersji "przed" w życiu nie wpadłabym na to, że można zrobić z niej takie cuda ;)
<3<3<3 dziękuje
DeleteKolejna genialna metamorfoza, ja chyba nigdy nie przestane się zachwycać tym, jak potrafisz przerabiać ubrania:) Aż żal, że nie ma wśród mojej rodziny i znajomych kogoś tak zdolnego jak ty, podsunęłabym mu kilka swoich rzeczy ;)
ReplyDeleteA dziękuję ,twój komentarz poprawił mi humor <3
DeleteWiesz ja z barku takiej osoby sama chwyciłam za maszynę do szycia ^^
Świetnie to wszystko pokazałaś. :)
ReplyDeletethx!:))
DeleteZnakomity efekt! :)
ReplyDeletefajne rady na pewno je sobie gdzieś zapamiętam:D
ReplyDeleteOdkryłaś w niej potencjał. Ja ominęłabym ją szerokim łukiem, nie miałabym pomysłu :) Świetna przeróbka.
ReplyDeleteAleż potencjał w niej odkryłaś! Super!
ReplyDeleteOd razu lepiej wygląda sukienka, przeróbka super wykonana :)
ReplyDelete