Dust lightly with a puff after your shower — this DIY body powder leaves skin soft, fresh, and beautifully scented. There’s something wonderfully timeless about a soft puff of perfumed body powder . It’s more subtle than perfume, keeps skin silky, and carries a personal, intimate scent that lingers close to you. Best of all, you don’t need talc or complicated ingredients — you can make a talc-free body powder at home in minutes. In this guide, you’ll get: A from-scratch body dusting powder recipe (completely homemade) A baby powder upgrade recipe (transform a base you already have) 15+ scent blends you will love (from floral to cozy to citrus fresh) Pro tips on how to use, why to use, and how to make it silky and safe Why Use Perfuming Body Powder? Many people ask why bother with DIY perfumed body powder when sprays and perfumes exist. Here’s why: Soft, intimate fragrance : a veil of scent that stays close to skin Absorbs light moisture : perfect for...
Get link
Facebook
X
Pinterest
Email
Other Apps
table lamp / lampka na biurko Diy
Get link
Facebook
X
Pinterest
Email
Other Apps
Oglądałam ostatnio przecudowny film pod tytułem Anna Karenina. Kostiumy pokazane tam są po prostu perfekcyjne, nie mniej po prostu zakochałam się w oświetleniu. Ten kto je wykonał musiał być mistrzem i chylę przed nim czoło. To oświetlenie , lampy idealnie oddają atmosferę miłości, pożądania i niebezpieczeństwa.
Postanowiłam , że także chcę poczuć tą atmosferę i a jakże posłużę się ku temu światłem .
I watched Anna Karenina lately . It's very beautiful movie, all those costumes are so perfect but I totally fall in love in with all those lights and lamps. Lights create this atmosfere of love, lust and danger.
I decided I need to have such lamp as well to feel even for a moment like heroine of romance.
Potrzebujesz:
You need:
Gips lub cement / gypsum or cement
foremkę / plactic bucket
śrubkę motylek / butterfly screw
śrubę / screw
podkładki metalowe / metal washer
listewkę dwie sztuki lub np. drewniany kij od szczotki , grube gałązki
2 wooden slats or twigs or simple broomstick
wiertarka / drill
lampka / lamp
Lampka przed:
Lamp before:
Jak zrobić stelaż do lampy, lampki ?
How to make a frame to the lamp?
do miski wypełnionej w 1/3 wodą wsypujemy tyle ile potrzebujemy gipsu lub cementu i mieszamy,powtarzamy czynność aż otrzymamy gęstą jednorodną masę
do gipsu wkładamy jedną część drewnianego stelażu ,
opcjonalnie
dekorujemy kamykami
i pozostawiamy do całkowitego wyschnięcia
To bowl filled in 1/3 with water add gypsum or cement and mix it as long as you'll receive thick homogeneous mass.
Put in gypsum or cement one part of the wooden slat
Optional
add some rocks :-)
Leave it for drying.
po około 24h wyciągamy z formy
After about 24 hours pull out the form
wywiercamy otwór w listwach i łączymy je razem za pomocą śruby , podkładek i śrubki motylka
Drill the hole in wooden slats and join them together with the help of screw , butterfly screw and metal washer.
lampka na biurko lamp
przybijamy lampkę do stelażu
Nail the lamp to to the frame
z pomocą gwoździa lub śrubek
with the help of nail or screw
i nasz stelaż jest już gotowy
voila! lamp frame is ready
drewniany stelaż do lampy
wood lamp
wedle gustu możemy go :przemalować lub okleić
You can paint, sand or taped it.
solidny fundament to podstawa nie tylko w budowie domu
solid foundation is important not only in houses
A jak zrobić żyrandol ? zapraszam do następnego wpisu :-)
In next post I will show how to make chandelier :-)
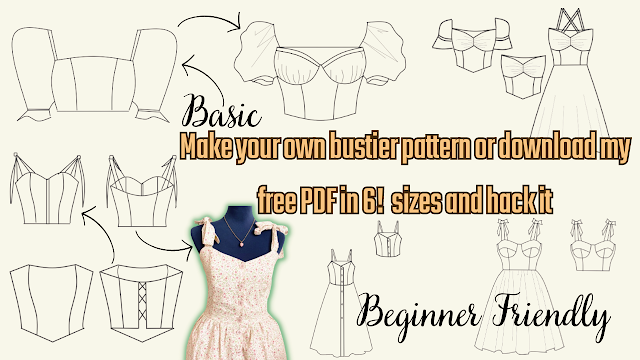
Are you ready to create your own bustier pattern? Look no further, because I've got you covered! In this tutorial, I will show you how to create your own basic bustier pattern or download my free printable PDF pattern in 6 sizes and hack it into 8 different styles, including a bustier with cups, milkmaid top, bustier with sleeves or without sleeves, bustier dress, and more. This tutorial is perfect for beginners, and I will guide you step-by-step on how to resize the pattern and add perfect sleeves. With this video, you can easily create your own custom-made bustier that fits you perfectly! But wait, there's more! Not only will you get access to my free PDF pattern, but you can also share it with your sewing friends. It's easy to download and print, and you can start creating your own bustier right away. So, don't hesitate to watch the whole video and start creating your own unique bustier pattern. And if you like this video, please give it a thumbs up and subscribe to ...
Looking for a quick and easy sewing project that's perfect for beginners? Look no further than my latest tutorial on how to sew a bralette top! This bralette top is made using fabric scraps, so it's not only budget-friendly, but also sustainable. Plus, I'm giving away a free printable PDF pattern that comes in all sizes, so you can easily make this top for yourself or as a gift for a friend. In my next post, I'll be sharing a video tutorial on how to use my free sewing PDF pattern, including how to resize it, hack it, and get creative with different variations. So make sure to subscribe to my channel and stay tuned for that! But for now, let's focus on making this super easy bralette top. My step-by-step tutorial includes detailed instructions and photos to guide you through every step of the process. And if you get stuck, don't worry - I'm always here to answer any questions you may have. So what are you waiting for? Download the free printable PDF patter...
Sewing a Backless Halter Top: An Easy and Eco-Friendly DIY Project Summer is around the corner, and what better way to prepare for the warm weather than by sewing your own backless halter top? This DIY project is perfect for beginners, as it's easy to make and requires only a few fabric scraps. In this tutorial, you will learn how to sew a stylish and comfortable backless halter top using your own measurements and a free printable PDF pattern. The pattern is designed to be adjustable, so you can customize it to your exact size. The best part of this project is that it's not only fun and easy, but it's also eco-friendly. You can use fabric scraps or old clothes that you no longer wear, and turn them into a beautiful and functional piece of clothing. To get started, you will need the following supplies: Fabric scraps or old clothes Ruler Scissors Sewing machine Pins Free printable PDF pattern (downloadable from the blog post) Step-by-Step Tutorial: Download and print the PDF ...
.heif)


.png)
.png)
Bardzo fajnie wygląda! Bardzo oryginalne!
ReplyDelete____________________________
Pozdrawiam serdecznie, Ada!
http://hafciarkablog.blogspot.com/
dziekuje i także serdecznie pozdrawiam :-)
Deletejak Ty znajdujesz na to wszystko czas ? jestes niesamowita :)
ReplyDeletelol staram się być bardzo zorganizowana, slicznie dziekuje
DeleteFajowska :)
ReplyDeletedzieki! :-)
DeleteŁadniej by wyglądało gdyby listewki były wygładzone - oheblowane lub chociaż przetarte papierem ściernym ;)
ReplyDeletezachęcam do zrobienia tego w swoim projekcie i pozdrawiam ;-)
Delete