Dust lightly with a puff after your shower — this DIY body powder leaves skin soft, fresh, and beautifully scented. There’s something wonderfully timeless about a soft puff of perfumed body powder . It’s more subtle than perfume, keeps skin silky, and carries a personal, intimate scent that lingers close to you. Best of all, you don’t need talc or complicated ingredients — you can make a talc-free body powder at home in minutes. In this guide, you’ll get: A from-scratch body dusting powder recipe (completely homemade) A baby powder upgrade recipe (transform a base you already have) 15+ scent blends you will love (from floral to cozy to citrus fresh) Pro tips on how to use, why to use, and how to make it silky and safe Why Use Perfuming Body Powder? Many people ask why bother with DIY perfumed body powder when sprays and perfumes exist. Here’s why: Soft, intimate fragrance : a veil of scent that stays close to skin Absorbs light moisture : perfect for...
Get link
Facebook
X
Pinterest
Email
Other Apps
stained glass lamp shade / jak zrobić klosz z materiału
Get link
Facebook
X
Pinterest
Email
Other Apps
W poprzednim poście pokazałam jak zrobić lampę dzisiaj więc zaprezentuje wykonanie abażuru.
In my last post I show how to make a lamp so now it's time to present how to make a lampshade.
Potrzebujesz:
You need:
Kawałki materiałów w wybranych przez nas kolorach i rozmiarach
opcjonalnie możesz wyciąć w różnych kształtach używając foremki !
Fabric scraps in chosen colors ,shapes and sizes.
You can use laces, curtains, twines,yarns etc.
Optional
You can cut chosen shapes with the help of plastic forms.
papierowa tubka
nożyczki
klej wikol , introligatorski lub do tapet
balon lub piłka np. plażowa
Jak zrobić klosz krok po kroku ?
How to make a lampshade step by step ?
tworzymy mieszankę kleju wikol lub introligatorski z wodą 50% na 50%
zamaczamy skrawki
Create the mixture of glue and water 50/ 50.
Soak fabric scraps in it.
Jak zrobić stelaż do klosza?
How to make a frame to lampshade?
tworzymy stelaż z kartonowej tubki
Create frame from paper tube.
Przykładamy stelaż naszego klosza do balona.
Put new frame of our lampshade on balloon.
następnie zmoczonymi skrawkami materiałów w kleju oklejamy nasz balon wraz ze stelażem,
gdy już zakończymy oklejać
pozostawiamy nasz klosz do wyschnięcia najlepiej na 24 h
po tym czasie wystarczy uwolnić klosz z balonu i
Compose new lampshade on balloon with soaked, in water and glue mixture, fabric scraps.
Leave it to drying for 24 hours, after this time remove the balloon.
Gotowa lampa
Ta-da !
Jak widać na zdjęciu lampkę można regulować czy to w dzień czy w nocy ;)
Voila! lampshade is ready , as you can see on photos it has adjustable height.
Efekt końcowy mojego klosza nie bardzo przypadł mi do gustu więc zrobiłam drugą wersje którą do stworzenia zainspirowałam się lampami witrażowymi od Tiffanego więc zapraszam do następnego postu :-)
To be honest I didn't like the final result of my work I wanted something more romantic, more XIX century style that's why I created new lampshade and I will show it in next post :-)
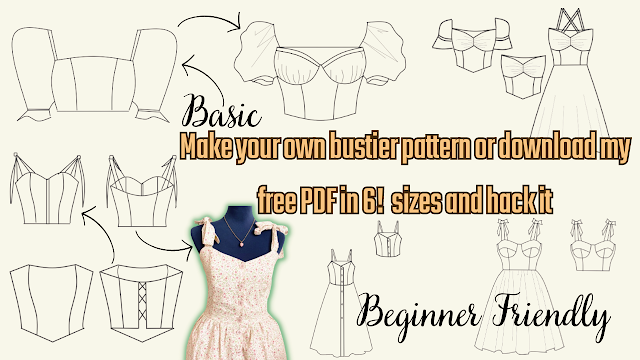
Are you ready to create your own bustier pattern? Look no further, because I've got you covered! In this tutorial, I will show you how to create your own basic bustier pattern or download my free printable PDF pattern in 6 sizes and hack it into 8 different styles, including a bustier with cups, milkmaid top, bustier with sleeves or without sleeves, bustier dress, and more. This tutorial is perfect for beginners, and I will guide you step-by-step on how to resize the pattern and add perfect sleeves. With this video, you can easily create your own custom-made bustier that fits you perfectly! But wait, there's more! Not only will you get access to my free PDF pattern, but you can also share it with your sewing friends. It's easy to download and print, and you can start creating your own bustier right away. So, don't hesitate to watch the whole video and start creating your own unique bustier pattern. And if you like this video, please give it a thumbs up and subscribe to ...
Looking for a quick and easy sewing project that's perfect for beginners? Look no further than my latest tutorial on how to sew a bralette top! This bralette top is made using fabric scraps, so it's not only budget-friendly, but also sustainable. Plus, I'm giving away a free printable PDF pattern that comes in all sizes, so you can easily make this top for yourself or as a gift for a friend. In my next post, I'll be sharing a video tutorial on how to use my free sewing PDF pattern, including how to resize it, hack it, and get creative with different variations. So make sure to subscribe to my channel and stay tuned for that! But for now, let's focus on making this super easy bralette top. My step-by-step tutorial includes detailed instructions and photos to guide you through every step of the process. And if you get stuck, don't worry - I'm always here to answer any questions you may have. So what are you waiting for? Download the free printable PDF patter...
Sewing a Backless Halter Top: An Easy and Eco-Friendly DIY Project Summer is around the corner, and what better way to prepare for the warm weather than by sewing your own backless halter top? This DIY project is perfect for beginners, as it's easy to make and requires only a few fabric scraps. In this tutorial, you will learn how to sew a stylish and comfortable backless halter top using your own measurements and a free printable PDF pattern. The pattern is designed to be adjustable, so you can customize it to your exact size. The best part of this project is that it's not only fun and easy, but it's also eco-friendly. You can use fabric scraps or old clothes that you no longer wear, and turn them into a beautiful and functional piece of clothing. To get started, you will need the following supplies: Fabric scraps or old clothes Ruler Scissors Sewing machine Pins Free printable PDF pattern (downloadable from the blog post) Step-by-Step Tutorial: Download and print the PDF ...
.heif)


.png)
.png)
Świetny blog, niezwykłe pomysły, kiedys mnie odwiedziłas i ja dzisiaj wstąpiłam z ciekawości, zostaje na dłużej...pozdrawiam:) Bea:)
ReplyDeletedziekuje, uwielbiam ludzi z pasją więc jak mogłam nie wpaść :-) jest mi bardzo milo Cię tu gościć ;-)
DeleteWidzę, że się rozszalałaś z oświetleniem :D Fajnie wyszło :)
ReplyDeleteczy ja wiem to tylko 1 lampa :-)
Deletedziękuje