Dust lightly with a puff after your shower — this DIY body powder leaves skin soft, fresh, and beautifully scented. There’s something wonderfully timeless about a soft puff of perfumed body powder . It’s more subtle than perfume, keeps skin silky, and carries a personal, intimate scent that lingers close to you. Best of all, you don’t need talc or complicated ingredients — you can make a talc-free body powder at home in minutes. In this guide, you’ll get: A from-scratch body dusting powder recipe (completely homemade) A baby powder upgrade recipe (transform a base you already have) 15+ scent blends you will love (from floral to cozy to citrus fresh) Pro tips on how to use, why to use, and how to make it silky and safe Why Use Perfuming Body Powder? Many people ask why bother with DIY perfumed body powder when sprays and perfumes exist. Here’s why: Soft, intimate fragrance : a veil of scent that stays close to skin Absorbs light moisture : perfect for...
Get link
Facebook
X
Pinterest
Email
Other Apps
Domowy sposób na cellulit / Natural Remedies for Cellulite
Get link
Facebook
X
Pinterest
Email
Other Apps
Już od jakiegoś czasu nie dałam żadnego posta dotyczącego tworzenia własnych, efektywnych, ekologicznych i tanich kosmetyków. Czas nadrobić zaległości :-).
Postanowiłam wsiąść na tapetę cellulit . Nie będę pisała co to jest oraz co go powoduje, bo takie informacje można znaleźć dosłownie wszędzie. Skupie się za to na profesjonalnych domowych kosmetykach , które można zrobić samemu w domu.
Najważniejsza informacja dotycząca walki ze skórką pomarańczową to to , że aby całkowicie pozbyć się tego defektu trzeba połączyć 4 rzeczy : dietę , ćwiczenia, masaż i kosmetyki , dodałabym jeszcze do tego saunę , gdyż genialnie pomaga pozbywać się toksyn , ale nie jest ona niezbędna.
Myślę , że jeśli będziemy systematycznie korzystać z tych 4 sposobów to osiągniemy pełny sukces!.
Na pewno gdzieś słyszeliście , że sól morska jest naturalnym wrogiem cellulitu, jest to całkowita prawda , a najprzyjemniej jest z niej korzystać w kąpieli.
Dlatego dzisiaj przedstawie jak wykonać 2 rewelacyjne sole do kąpieli.
Sól do kąpieli numer 1 Potrzebujemy:
salt bath number 1
Wykonanie:
Tak wygląda sól po wymieszaniu. A pachnie .. bosko!
Sól do kapieli numer 2
Potrzebujemy:
Sól ta z powodu zawartości alg , co tam będę kłamała , śmierdzi , chyba , że uwielbiamy morze pachnące rybami. Nie mniej jednak jest to najlepiej działająca sól jaką miałam okazje używać. Pierwsze wyraźne efekty widać już po 3 użyciu :-) .
W ramach rehabilitacji tej soli muszę dodać , że zapach się nie utrzymuje , po spłukaniu zwyczajnie zanika.
salt bath number 2
The smell during bath isn't the nicest but the results are fantastics. It's the best bath salt I've ever used. The smell of algaes dissapper very soon after bath.
Tak wygląda to cudo po wymieszaniu.
Trwałość soli :
Na spokojnie z rok , a nawet dłużej.
Jak często:
Bierzemy taka kąpiel 1 lub 2 razy w tygodniu
Jak wykonać :
Pól kilograma soli rozpuszczamy w gorącej wodzie , następnie uzupełniamy wannę chłodną wodą , aby temperatura wynosiła około 37, 38 stopni
Jak długo:
Najlepiej 15 minut odprężenia w wannie przy miłej muzyce lub ciekawej książce.
Co po kapieli :
Po kąpieli spłukujemy się pod prysznicem, zakładamy szlafrok i odpoczywamy 30 minut. Nie ma najmniejszej potrzeby stosować balsam , skóra będzie idealnie nawilżona.
Końcowy efekt: 2 super efektywne i naturalne sole do kapieli.
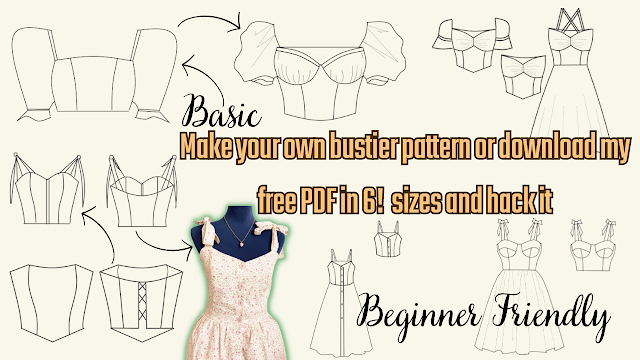
Are you ready to create your own bustier pattern? Look no further, because I've got you covered! In this tutorial, I will show you how to create your own basic bustier pattern or download my free printable PDF pattern in 6 sizes and hack it into 8 different styles, including a bustier with cups, milkmaid top, bustier with sleeves or without sleeves, bustier dress, and more. This tutorial is perfect for beginners, and I will guide you step-by-step on how to resize the pattern and add perfect sleeves. With this video, you can easily create your own custom-made bustier that fits you perfectly! But wait, there's more! Not only will you get access to my free PDF pattern, but you can also share it with your sewing friends. It's easy to download and print, and you can start creating your own bustier right away. So, don't hesitate to watch the whole video and start creating your own unique bustier pattern. And if you like this video, please give it a thumbs up and subscribe to ...
Looking for a quick and easy sewing project that's perfect for beginners? Look no further than my latest tutorial on how to sew a bralette top! This bralette top is made using fabric scraps, so it's not only budget-friendly, but also sustainable. Plus, I'm giving away a free printable PDF pattern that comes in all sizes, so you can easily make this top for yourself or as a gift for a friend. In my next post, I'll be sharing a video tutorial on how to use my free sewing PDF pattern, including how to resize it, hack it, and get creative with different variations. So make sure to subscribe to my channel and stay tuned for that! But for now, let's focus on making this super easy bralette top. My step-by-step tutorial includes detailed instructions and photos to guide you through every step of the process. And if you get stuck, don't worry - I'm always here to answer any questions you may have. So what are you waiting for? Download the free printable PDF patter...
Sewing a Backless Halter Top: An Easy and Eco-Friendly DIY Project Summer is around the corner, and what better way to prepare for the warm weather than by sewing your own backless halter top? This DIY project is perfect for beginners, as it's easy to make and requires only a few fabric scraps. In this tutorial, you will learn how to sew a stylish and comfortable backless halter top using your own measurements and a free printable PDF pattern. The pattern is designed to be adjustable, so you can customize it to your exact size. The best part of this project is that it's not only fun and easy, but it's also eco-friendly. You can use fabric scraps or old clothes that you no longer wear, and turn them into a beautiful and functional piece of clothing. To get started, you will need the following supplies: Fabric scraps or old clothes Ruler Scissors Sewing machine Pins Free printable PDF pattern (downloadable from the blog post) Step-by-Step Tutorial: Download and print the PDF ...




i want to have a bath with it !!!
ReplyDelete:-)
DeleteFajne przepisy, chociaż algi mnie przerażają :) Chętnie którąś sól zrobię, jak składniki nabędę :D
ReplyDeletePrawda, algi sa przerażające z początku , ale naprawdę rewelacyjnie działają.
DeleteZa to 2 sól rewelacyjnie pachnie :-)
oj ciekawa, muszę wypróbować no i fajny sposób na prezent!
ReplyDeleteFaktycznie :-), dałaś mi świetny pomysł na prezent dla koleżanki, która wciąż smuci o odchudzaniu.
Delete