Dust lightly with a puff after your shower — this DIY body powder leaves skin soft, fresh, and beautifully scented. There’s something wonderfully timeless about a soft puff of perfumed body powder . It’s more subtle than perfume, keeps skin silky, and carries a personal, intimate scent that lingers close to you. Best of all, you don’t need talc or complicated ingredients — you can make a talc-free body powder at home in minutes. In this guide, you’ll get: A from-scratch body dusting powder recipe (completely homemade) A baby powder upgrade recipe (transform a base you already have) 15+ scent blends you will love (from floral to cozy to citrus fresh) Pro tips on how to use, why to use, and how to make it silky and safe Why Use Perfuming Body Powder? Many people ask why bother with DIY perfumed body powder when sprays and perfumes exist. Here’s why: Soft, intimate fragrance : a veil of scent that stays close to skin Absorbs light moisture : perfect for...
Get link
Facebook
X
Pinterest
Email
Other Apps
how to make cotton balls / jak zrobić cotton balls?
Get link
Facebook
X
Pinterest
Email
Other Apps
Cotton balls czyli bawełniane kule , hmm jakoś niezbyt fajnie to brzmi po polsku , to obecnie dekoracyjny must have. Uważam , że są bardzo ładne i miłe dla oka, ale jakoś niezbyt chciało mi się je robić, niestety albo i stety czasami nawet i moja babci buszuje po internecie, podczas jednego z takich wypadów w nieznane wpadł jej w oko ten uroczy element dekoracyjny i żeby zanadto się nie rozpisywać, jak wiecie w czwartek przypada dzień babci , i ja musiałam takie zrobić. ( Dla Ciebie babciu wszystko <3 ). Przeglądnęłam tutoriale i zdecydowana większość jakaś niekompletna, z śmierdzącym klejem albo i całkiem droga, a można i taniutko i jak najbardziej ekologicznie.
Cotton balls zrób to sama !
Co potrzebujesz, aby zrobić cotton balls ?
Balony o wybranych przez ciebie kształtach i rozmiarach
nici,włóczki,mulinę,sznurki (wedle gustu:)),
ja użyłam recyklingową włóczkę z bolerka z sh po 1zł, 100% bawełna %(^-^)%
klamerki
klej wikol,introligatorski,do tapet lub krochmal domowej roboty !
(najtańsza i najbardziej ekologiczna wersja)
dodatkowo: plastikowa butelka, igła,wieszak i spinacze
Jak zrobić Cotton balls ,"śnieżne kule" ?
napompowujemy balony do wybranej przez nas wielkości ,zakręcamy i spinamy klamerkami
Przepis na eko i prosty usztywniacz czyli krochmal
z tym przepisem uzyskasz najlepsza konsystencje krochmalu do usztywnienia nici,włóczek,sznurków
Ps. możesz użyć innego plastikowego opakowania, butelka to tylko propozycja ;)
napełniamy butelkę wybranym klejem lub krochmalem ,następnie przebijamy igłą z nicą butelkę jak na zdjęciach
(jak widać postarałam się uchwycić "moment' przełożenia igły z nicią ^_^)
przekładamy igłę i ta da ! następnie osuszamy ją i chowamy ,teraz wystarczy nam już sama włóczka :]
Jest to idealny sposób, gdyż jednym ruchem odwijamy włóczkę ,moczymy w kleju, odciskamy nadmiar i nawijamy na balon !
Teraz przeciągamy nić nawijamy na balon i tak w kółko ,aż dojdziemy do upragnionego kształtu i rozmiaru :]
Jak zrobić cotton balls w skrócie
Jak wysuszyć cotton balls ?
z pomocą klamerek z uszkami suszenie to łatwizna :)
potrzebujesz już tylko spinaczy i wieszaka
następnie powieś obok kaloryfera szybko wyschną
Jak wyciągnąć balon z kuli? Balon z kuli można wyciągnąć na dwa sposoby: A. na barbarzyńcę ,przebijamy szpilką "BUMM" B. recyclingowo czyli pokojowo ściągamy klamrę i odkręcamy, powietrze lekko uchodzi następnie odklejamy balon, nie ma strachu kule łatwo powrócą do odpowiedniego kształtu jeśli balon ponownie napompujesz ,wypompujesz i wyciągniesz ^^
A tak prezentują się gotowe kule "Cotton balls"
Moje "śnieżne kule" czyli cotton balls zrobione z recyklingowej włóczki
Świetny tutorial, na pewno na długo pozostanie mi w pamięci! I jeszcze fakt, że nitka pochodziła ze starego sweterka! Jestem zauroczona, wspaniały recykling!!! :)))
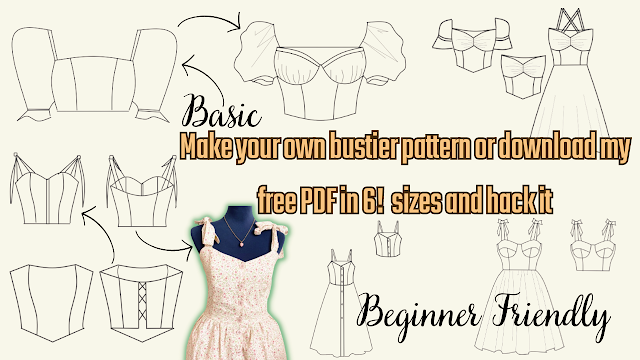
Are you ready to create your own bustier pattern? Look no further, because I've got you covered! In this tutorial, I will show you how to create your own basic bustier pattern or download my free printable PDF pattern in 6 sizes and hack it into 8 different styles, including a bustier with cups, milkmaid top, bustier with sleeves or without sleeves, bustier dress, and more. This tutorial is perfect for beginners, and I will guide you step-by-step on how to resize the pattern and add perfect sleeves. With this video, you can easily create your own custom-made bustier that fits you perfectly! But wait, there's more! Not only will you get access to my free PDF pattern, but you can also share it with your sewing friends. It's easy to download and print, and you can start creating your own bustier right away. So, don't hesitate to watch the whole video and start creating your own unique bustier pattern. And if you like this video, please give it a thumbs up and subscribe to ...
Looking for a quick and easy sewing project that's perfect for beginners? Look no further than my latest tutorial on how to sew a bralette top! This bralette top is made using fabric scraps, so it's not only budget-friendly, but also sustainable. Plus, I'm giving away a free printable PDF pattern that comes in all sizes, so you can easily make this top for yourself or as a gift for a friend. In my next post, I'll be sharing a video tutorial on how to use my free sewing PDF pattern, including how to resize it, hack it, and get creative with different variations. So make sure to subscribe to my channel and stay tuned for that! But for now, let's focus on making this super easy bralette top. My step-by-step tutorial includes detailed instructions and photos to guide you through every step of the process. And if you get stuck, don't worry - I'm always here to answer any questions you may have. So what are you waiting for? Download the free printable PDF patter...
Sewing a Backless Halter Top: An Easy and Eco-Friendly DIY Project Summer is around the corner, and what better way to prepare for the warm weather than by sewing your own backless halter top? This DIY project is perfect for beginners, as it's easy to make and requires only a few fabric scraps. In this tutorial, you will learn how to sew a stylish and comfortable backless halter top using your own measurements and a free printable PDF pattern. The pattern is designed to be adjustable, so you can customize it to your exact size. The best part of this project is that it's not only fun and easy, but it's also eco-friendly. You can use fabric scraps or old clothes that you no longer wear, and turn them into a beautiful and functional piece of clothing. To get started, you will need the following supplies: Fabric scraps or old clothes Ruler Scissors Sewing machine Pins Free printable PDF pattern (downloadable from the blog post) Step-by-Step Tutorial: Download and print the PDF ...
.heif)


.png)
.png)
Mam zamiar zrobić kule, a Twoja metoda wydaje się nieskomplikowana i tania, więc skorzystam z niej :D
ReplyDeletezachęcam ! :-)
Deleteświetne! tez musze sobie takie kule :) :)
ReplyDelete&(^-^)&
DeleteŚwietny tutorial, na pewno na długo pozostanie mi w pamięci!
ReplyDeleteI jeszcze fakt, że nitka pochodziła ze starego sweterka! Jestem zauroczona, wspaniały recykling!!! :)))
Pozdrawiam serdecznie, Monika W. :)
Wielkie dzieki , także serdecznie pozdrawiam :-)
DeleteTakie łatwe wykonanie a jaki efekt! Super :)
ReplyDelete&(^-^)&
DeleteAle cuda ! Uwielbiam te kule, ale nigdy nie chciało mi się ich robić, bałam się, że nie wyjdą ;) Ale cóż.. może teraz spróbuję ! :)
ReplyDeleteZdecydowanie spróbuj,są prostsze w wykonaniu niż to wygląda :)
DeleteTrzymam kciuki !&(^_^)&
Krochmal ... Genialnie proste :)
ReplyDeleteproste rozwiązania zwykle są najlepsze :-)
Delete