Dust lightly with a puff after your shower — this DIY body powder leaves skin soft, fresh, and beautifully scented. There’s something wonderfully timeless about a soft puff of perfumed body powder . It’s more subtle than perfume, keeps skin silky, and carries a personal, intimate scent that lingers close to you. Best of all, you don’t need talc or complicated ingredients — you can make a talc-free body powder at home in minutes. In this guide, you’ll get: A from-scratch body dusting powder recipe (completely homemade) A baby powder upgrade recipe (transform a base you already have) 15+ scent blends you will love (from floral to cozy to citrus fresh) Pro tips on how to use, why to use, and how to make it silky and safe Why Use Perfuming Body Powder? Many people ask why bother with DIY perfumed body powder when sprays and perfumes exist. Here’s why: Soft, intimate fragrance : a veil of scent that stays close to skin Absorbs light moisture : perfect for...
Get link
Facebook
X
Pinterest
Email
Other Apps
DIY Tutorial / stamp stencil printed t shirt / Jak ozdobić bluzkę t-shirt / jak zrobić pieczątkę / alfabet z pianki / foam stamp diy/ krok po kroku
Get link
Facebook
X
Pinterest
Email
Other Apps
Naszywki, nadruki ,malunki, obrazy wszech otaczają nas ze wszystkich półek, wieszaków i manekinów sklepowych i jak tu się oprzeć ? :P Można powiedzieć moda zawsze wraca więc czemu by się nie "obmalować " napisami i obrazkami :)
Jest cała masa sposobów: wydrukować i wycinać nożykiem ,nożyczkami lub też iść na całkowitą łatwiznę i zakupić w dziale dziecięcym matę piankową z literkami !:]
(nie)tylko do zabawy
i kto powiedział że nie ma w nas "trochę z dziecka";)
każda literka jest wyjmowana
można kupić kilka mat i układać cale zdania za jednym razem :)
Mała lekcja przed jak mieszać kolory
,aby z małej ilości farb uzyskać przeróżne kolory odcienie i barwy
bez potrzeby kupowania całej palety
podstawowe kolory (poza złotym i srebrnym ;))
A malować można nadruki na kilka sposobów !:)
Bluzka przed (testowa)
potrzebujemy farby akrylowe do tkanin lub inne
Pierwszy sposób
Układamy nasze wybrane słowo lub słowa
wyjmujemy literki
i pędzelkiem malujemy wewnątrz
odrywamy
gotowe
drugi sposób
z wyciągniętych szablonów mamy literki stępelki
wystarczy zamoczyć w farbie lub pomalować pędzelkiem
i przyłożyć do bluzki lekko dociskając
pojedynczo lub całe zdania
i gotowe !:)
I utrwalamy przeprasowując żelazkiem :)
prać można w 30 stopniach w pralce lub ręcznie :]
sposób trzeci
marker są też specjalne markery jak i kredki do tkanin
skreślam swój t shirt na zawsze xD
Któż powiedział, że malować mozna tylko na ubraniach ? można tak ozdabiać też notesy, teczki ,meble itd
Efekt końcowy mojego "ściętego" podkoszulka z szarego smutnego na "szalony ekstrawagancki nonszalancki "hehe jak się rozkręciłam ,artystyczna furia szalonego "malarza"na dość modnym w swojej "krótkowości" podkoszulku. odsłaniamy swoje wyćwiczone brzuszki na lato
dorzucamy czapkę bejsbolówkę i możemy iść biegać ;)
Twórz swoje własne zdania lub też idź na całość i stępuj gdzie i jak popadnie.
Można użyć foremek między innymi tych do ciasteczek ;) lub też innych piankowych zabawek jako szablony w różne wzory
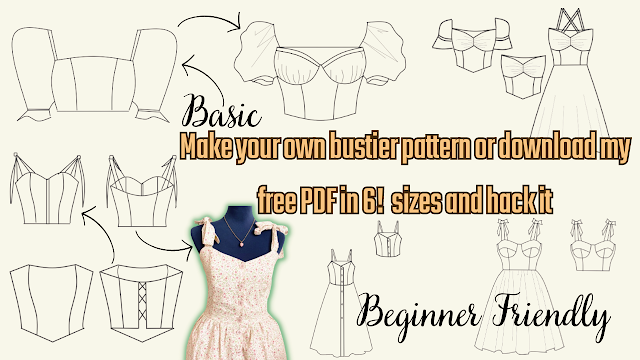
Are you ready to create your own bustier pattern? Look no further, because I've got you covered! In this tutorial, I will show you how to create your own basic bustier pattern or download my free printable PDF pattern in 6 sizes and hack it into 8 different styles, including a bustier with cups, milkmaid top, bustier with sleeves or without sleeves, bustier dress, and more. This tutorial is perfect for beginners, and I will guide you step-by-step on how to resize the pattern and add perfect sleeves. With this video, you can easily create your own custom-made bustier that fits you perfectly! But wait, there's more! Not only will you get access to my free PDF pattern, but you can also share it with your sewing friends. It's easy to download and print, and you can start creating your own bustier right away. So, don't hesitate to watch the whole video and start creating your own unique bustier pattern. And if you like this video, please give it a thumbs up and subscribe to ...
Looking for a quick and easy sewing project that's perfect for beginners? Look no further than my latest tutorial on how to sew a bralette top! This bralette top is made using fabric scraps, so it's not only budget-friendly, but also sustainable. Plus, I'm giving away a free printable PDF pattern that comes in all sizes, so you can easily make this top for yourself or as a gift for a friend. In my next post, I'll be sharing a video tutorial on how to use my free sewing PDF pattern, including how to resize it, hack it, and get creative with different variations. So make sure to subscribe to my channel and stay tuned for that! But for now, let's focus on making this super easy bralette top. My step-by-step tutorial includes detailed instructions and photos to guide you through every step of the process. And if you get stuck, don't worry - I'm always here to answer any questions you may have. So what are you waiting for? Download the free printable PDF patter...
Sewing a Backless Halter Top: An Easy and Eco-Friendly DIY Project Summer is around the corner, and what better way to prepare for the warm weather than by sewing your own backless halter top? This DIY project is perfect for beginners, as it's easy to make and requires only a few fabric scraps. In this tutorial, you will learn how to sew a stylish and comfortable backless halter top using your own measurements and a free printable PDF pattern. The pattern is designed to be adjustable, so you can customize it to your exact size. The best part of this project is that it's not only fun and easy, but it's also eco-friendly. You can use fabric scraps or old clothes that you no longer wear, and turn them into a beautiful and functional piece of clothing. To get started, you will need the following supplies: Fabric scraps or old clothes Ruler Scissors Sewing machine Pins Free printable PDF pattern (downloadable from the blog post) Step-by-Step Tutorial: Download and print the PDF ...
.heif)


.png)
.png)
świetny pomysł ! :D
ReplyDeletety to masz zawsze fajne pomysly:)
ReplyDeleteDziękuję za podzielenie się świetnym pomysłem, no i oczywiście kursikiem =D
ReplyDeletePozdrawiam cieplutko =}
pomysły fajne ale wykonanie i pomysł ,kompozycja niestety do bani....
ReplyDeleteswietny pomysł:))
ReplyDeleteAle super pomysł ! musze spróbować
ReplyDeletesuper pomysł :D
ReplyDeleteThis is so awesome and looks like a lot of fun! :)
ReplyDeletePomysł fajny, ale wykonanie bardzo nieestetyczne. No i "stempelki", a nie "stępelki"...
ReplyDeletefujka. będę kolejnym hejterem. passkudne
ReplyDelete