Dust lightly with a puff after your shower — this DIY body powder leaves skin soft, fresh, and beautifully scented. There’s something wonderfully timeless about a soft puff of perfumed body powder . It’s more subtle than perfume, keeps skin silky, and carries a personal, intimate scent that lingers close to you. Best of all, you don’t need talc or complicated ingredients — you can make a talc-free body powder at home in minutes. In this guide, you’ll get: A from-scratch body dusting powder recipe (completely homemade) A baby powder upgrade recipe (transform a base you already have) 15+ scent blends you will love (from floral to cozy to citrus fresh) Pro tips on how to use, why to use, and how to make it silky and safe Why Use Perfuming Body Powder? Many people ask why bother with DIY perfumed body powder when sprays and perfumes exist. Here’s why: Soft, intimate fragrance : a veil of scent that stays close to skin Absorbs light moisture : perfect for...
Get link
Facebook
X
Pinterest
Email
Other Apps
sweater recon / Jak zmniejszyć sweter ?
Get link
Facebook
X
Pinterest
Email
Other Apps
Weather ☁,here where I live, is still very rainy 🌂 and cold , that's why I decided to come back to resizing sweaters ✂. This time I will show how to resize sweater according to earlier made pattern 📏from old fit sweater and new way of attaching sleeves. Here 👈 you can see different way of resizing sweater.
Niestety pogoda ☔ w kwietniu nas nie rozpieszcza i wszystkie znaki na niebie i ziemi mówią, że to szybko się nie zmieni. W związku z tym zabrałam się ponownie za zwężanie swetrów 👘.
Tym razem zwęzimy sweter z pomocą wcześniej przygotowanego wykroju ze starego swetra i nauczymy się nowego sposobu wszywania rękawów 🔍 Tutaj 👈 inny sposób zwężania swetrów.
Big sweater Before ✂ refashion:
Za duży sweter Przed przeróbką:
This very pretty but also too big ⇔ sweater is 60 % wool and 40 % cashmere.
Thanks this smart 💡 combination it's gently to the skin. I don't know if it's only me but 100 % wool clothes are harsh to my skin, I feel something like ''biting'' 👹.
In sum if it comes to this sweater : perfect combination of fabrics ➕ beautiful warm red color ➕ really nice neckline = perfect sweater to refashion
Ten prześliczny czerwony sweterek składa się w 60 % z wełny i 40 % z kaszmiru.
Uwielbiam takie połączenia ✔ ,gdyż wełna daje to ciepło ☀, które w Polsce jest bardzo przydatne a kaszmir tą delikatność dla skóry. Kolejnym plusem tego swetra jest bardzo ładny dekolt , bardzo zależało mi , aby go zatrzymać .
How to change oversized sweater to fitted sweater❓
I wanted to keep the original neckline 👫, that's why I chose this way of refashion . According to the pattern, your own or downloaded from any newspaper, copy new shape of your sweater
Zależało mi na zachowaniu dekoltu w stanie oryginalnym stąd ten sposób na przerobienie swetra
Korzystając ze swojego wykroju 👘 lub pobranego z gazety 📰 odrysowujemy nowy wzór sweterka
main side is ready 😉
przód swetra odrysowany
fold again , now it's turn for back side copy it as well
składamy w pól (tył swetra)
i odrysowujemy tylna część sweterka
now it's time for little check up 🔎
front and back side must begin is same places
sprawdzamy czy przód zaczyna w tym samym miejscu co tył 💡
fun part 🎪 , cut the sweater in way you can see on photo cut off sleeves
rozcinamy lub rozpruwamy sweter i odcinamy ✂ rękawy
fold sweater as you can see on photo , we received beautiful pattern 🔨
sweter składamy w pół jak na zdjęciu i otrzymaliśmy piękny wykrój swetra 💡
cut ✂ excess fabric according to pattern
odcinamy nadmiar materiału zgodnie z odrysowaniem ✎
we received resized middle part of the sweater sew 📍 upper part
i otrzymaliśmy zwężony środek swetra
,zszywamy ramiona
How to resize sleeves❔
Jak zwęzić i zmniejszyć rękawy❓
cut the sleeve and apply pattern to it cut excess fabric and mark front , back and middle part of the sleeve, it's very important❕
rozcinamy rękaw i przykładamy wykrój ,odcinamy zbędny materiał i zaznaczmy przód tył i środek rękawa to ważne ❗
How to attach a sleeve ❔
Jak wszyć i przyszyć rękawy ❓
attach sleeve to the sweater according to markings
front to front, back to back and middle part to middle part
do swetra przypinamy 📍 rękaw zgodnie z oznaczeniami
przód do przodu, tył do tyłu i środek do środka
and sew it 🔧
i przyszywamy na maszynie
it should looks like that 👇
tak prezentują się przyszyte rękawy 😊
fold sweater , pin it with pins 📌 and sew remember about backstitch in hands and hips ❕
składamy sweter i spinamy szpilami 📍, następnie zszywamy pamiętają o szyciu wstecz przy rękach i biodrach ❕
and here you can see 👀 ready sweater on me , it's very comfortable , fit but ... yes there is always but 😄 I think I will change this sweater once again ✌, I want something more fashionable and with little longer ⇔sleeves
I tak sweter prezentuje się na mnie 💃, jest bardzo wygodny, super dopasowany ,ale postanowiłam , że zmienię go jeszcze raz , zależny mi na bardziej nowoczesnym wyglądzie💅 i troszkę dłuższych rękawach LOL
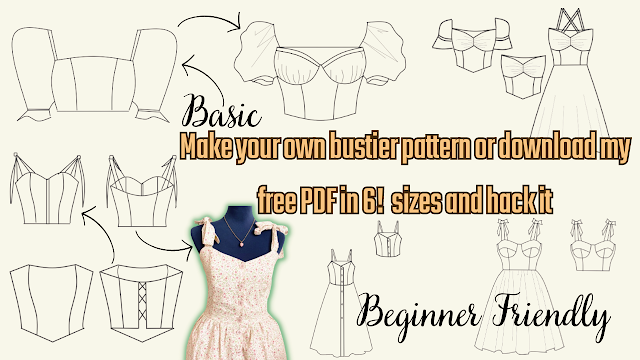
Are you ready to create your own bustier pattern? Look no further, because I've got you covered! In this tutorial, I will show you how to create your own basic bustier pattern or download my free printable PDF pattern in 6 sizes and hack it into 8 different styles, including a bustier with cups, milkmaid top, bustier with sleeves or without sleeves, bustier dress, and more. This tutorial is perfect for beginners, and I will guide you step-by-step on how to resize the pattern and add perfect sleeves. With this video, you can easily create your own custom-made bustier that fits you perfectly! But wait, there's more! Not only will you get access to my free PDF pattern, but you can also share it with your sewing friends. It's easy to download and print, and you can start creating your own bustier right away. So, don't hesitate to watch the whole video and start creating your own unique bustier pattern. And if you like this video, please give it a thumbs up and subscribe to ...
Looking for a quick and easy sewing project that's perfect for beginners? Look no further than my latest tutorial on how to sew a bralette top! This bralette top is made using fabric scraps, so it's not only budget-friendly, but also sustainable. Plus, I'm giving away a free printable PDF pattern that comes in all sizes, so you can easily make this top for yourself or as a gift for a friend. In my next post, I'll be sharing a video tutorial on how to use my free sewing PDF pattern, including how to resize it, hack it, and get creative with different variations. So make sure to subscribe to my channel and stay tuned for that! But for now, let's focus on making this super easy bralette top. My step-by-step tutorial includes detailed instructions and photos to guide you through every step of the process. And if you get stuck, don't worry - I'm always here to answer any questions you may have. So what are you waiting for? Download the free printable PDF patter...
Sewing a Backless Halter Top: An Easy and Eco-Friendly DIY Project Summer is around the corner, and what better way to prepare for the warm weather than by sewing your own backless halter top? This DIY project is perfect for beginners, as it's easy to make and requires only a few fabric scraps. In this tutorial, you will learn how to sew a stylish and comfortable backless halter top using your own measurements and a free printable PDF pattern. The pattern is designed to be adjustable, so you can customize it to your exact size. The best part of this project is that it's not only fun and easy, but it's also eco-friendly. You can use fabric scraps or old clothes that you no longer wear, and turn them into a beautiful and functional piece of clothing. To get started, you will need the following supplies: Fabric scraps or old clothes Ruler Scissors Sewing machine Pins Free printable PDF pattern (downloadable from the blog post) Step-by-Step Tutorial: Download and print the PDF ...
.heif)


.png)
.png)
To jest niesamowite co potrafisz zrobić z ubraniami, ten sweter wygląda świetnie!
ReplyDeletedziękuje <3333!
DeleteThanks! I never realized that the sweater (or any top) should be taken apart before resizing. Good to know!
ReplyDeleteHi, it's one of the possibilities, more professional, I'm very happy I could help !:-)
DeleteWow, szacun kochana :D Ja bym sie bała, że go zepsuję, haha :D Świetnie Ci to wyszło, teraz dużo lepiej wygląda ten sweter :)
ReplyDeletedziękuje!
Delete